terça-feira, 24 de maio de 2016

Desativar o Bloquearo de Pop-up do Internet Explorer via GPO

 Segue abaixo caminho da GPO para desativação:


*faça o mesmo para Zona de sites confiáveis se for o seu caso.

Adicionar Sites no Modo de Compatibilidade do Internet Explorer via GPO

Internet Explorer Compatibility Mode via GPO

O gerenciamento dos websites que ainda precisam rodar em modo de compatibilidade no Internet Explorer 8 / 9 pode ser feito via GPO.
A GPO pode ser configurada para computador ou para usuários através da ferramenta Group Policy Management Console (GPMC). Utilize o caminho abaixo para incluir sites na lista.
Configurações do computador / usuário –> Diretivas –> Modelos Administrativos –> Windows Components –> Internet Explorer –> Compatibility View –> Use Policy List of Internet Explorer 7 sites
image
Observações:
1) Os sites cadastrados na GPO não aparecem na lista do Internet Explorer. O Internet Explorer 9 apresenta apenas os sites incluídos pelo próprio usuário, conforme abaixo:
image
Para verificar a lista de sites configurados na GPO, verificar a seguinte chave de registro:
[HKEY_CURRENT_USER\Software\Policies\Microsoft\Internet Explorer\BrowserEmulation\PolicyList]
Essa configuração é padrão do Windows, e foi definida assim para impedir que os usuários excluam sites da lista que são incluídos via GPO e possam incluir conforme sua necessidade.
2) Não adicionar na lista o protocolo (http://). Incluir somente o nome do domínio.
Por exemplo, se incluir na lista da GPO “http://www.intel.com.br”, podemos ver que o site não está rodando em modo de compatibildade, pois as opções para rodar em compatibility mode continuam ativas.
image
Para rodar a página inicial da Intel em modo de compatibilidade inclua apenas “www.intel.com.br”. Neste caso, outras páginas que não iniciam com www, serão executadas sem o modo de compatibilidade, portanto, a sugestão é incluir somente o domínio, no caso “intel.com.br” (sem o www).
3) A Microsoft mantém uma lista global de sites que devem rodar em modo de compatibilidade. Esse lista é baixada através do Windows Update e fica armazenada no perfil de cada usuário, no caminho:
File:\\%LOCALAPPDATA%\Microsoft\Internet Explorer\IECompatData\iecompatdata.xml
A lista online atualizada pode ser consultada em:http://ie9cvlist.ie.microsoft.com/ie9cvlist.xml
4) O ícone para ativar o mode de compatiblidade só será apresentado para sites que o Internet Explorer detectar alguma incompatibilidade.
image
Se o site estiver rodando em modo de compatibilidade o ícone será apresentado no cor azul, conforme abaixo. Isso não vale para sites definido via GPO.
image

terça-feira, 3 de maio de 2016

IMPLANTANDO ULTRAVNC DENTRO DE UM AMBIENTE ACTIVE DIRECTORY UTILIZANDO A POLÍTICA DE GRUPO

Initial installation and testing

The purpose of this step is to download, install and configure UltraVNC to our liking. Once we have tested it, we can reuse the .ini configuration file for other computers. We will also import a registry setting from this test computer into the Group Policy Objects (GPO).
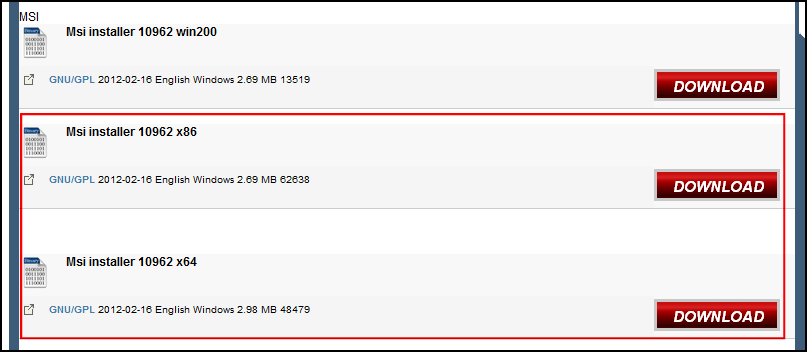
  1. Download the x86 and x64 Msi Installer packages from http://www.uvnc.com/downloads/ultravnc/100-download-ultravnc-10962.html
  2. Use the relevant .msi installer to install UltraVNC on a test computer. I’m using the x64 installer for a Win7 laptop.
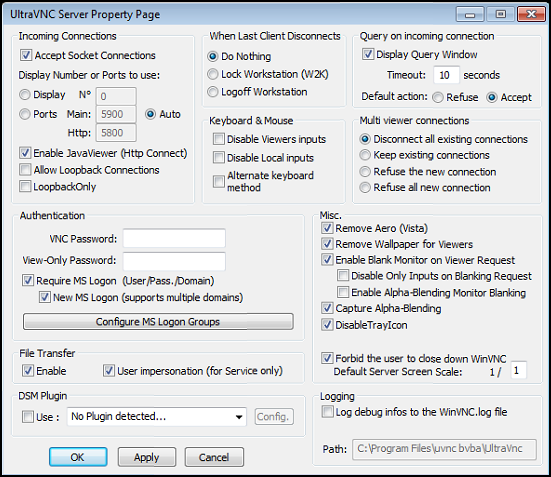
  3. Configure UltraVNC with the desired settings, eg:
    Note Require MS Logon is selected for Active Directory authentication.
  4. After making the configuration changes, restart the UltraVNC service (uvnc_service), or restart the computer.
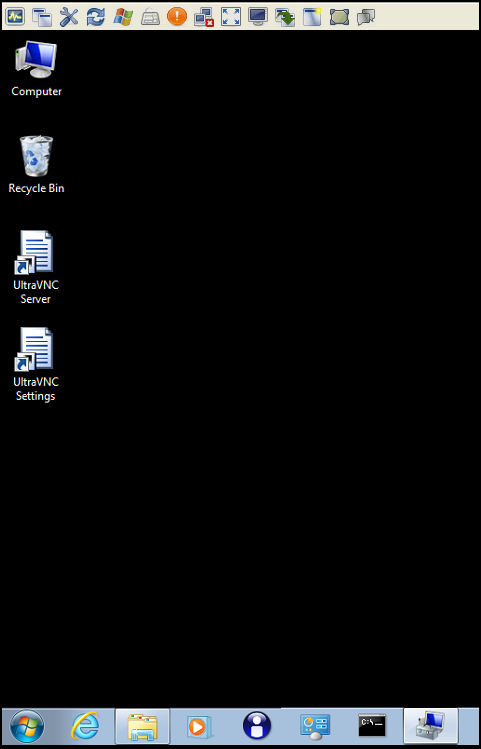
  5. Confirm you can connect to the test computer:

Modifying the UltraVNC installer to exclude desktop/start menu shortcuts

In this step we’re going to stop the UltraVNC shortcuts from being added to the user’s desktop.
  1. Download and install Orca, or alternatively you can try http://www.instedit.com
  2. Open UltraVnc_10962_x86.msi within Orca.
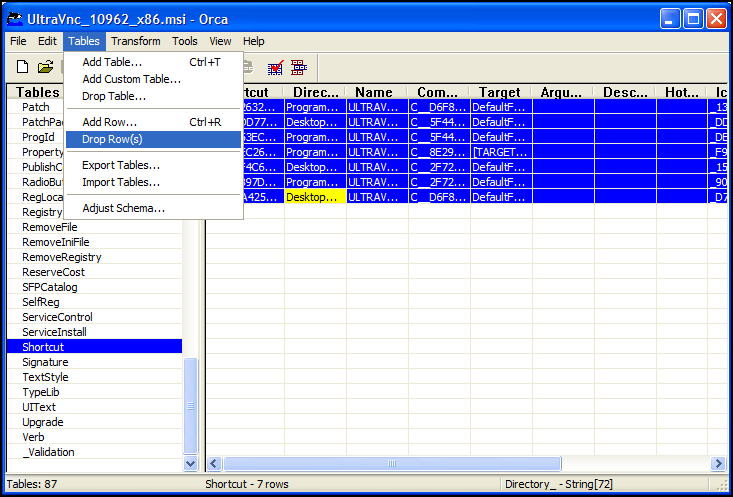
  3. Select the Shortcut table on the left, select all entries on the right, then select Drop Row(s) from the Tables menu:
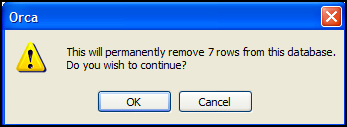
  4. Click OK to confirm removal:
  5. Select File > Save.
  6. Now do the same for UltraVnc_10962_x64.msi.

Creating a software deployment path

We need to create a UNC path on the network to deploy the software from.
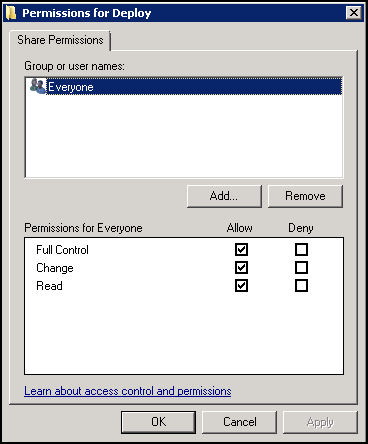
  1. Create a folder (eg. Deploy) and give Everyone, Full Control share permissions:
    I always find it easier to give Full Control permissions to Everyone, then control access via NTFS Security permissions. It makes troubleshooting file access issues a breeze…well, not as bad anyway.
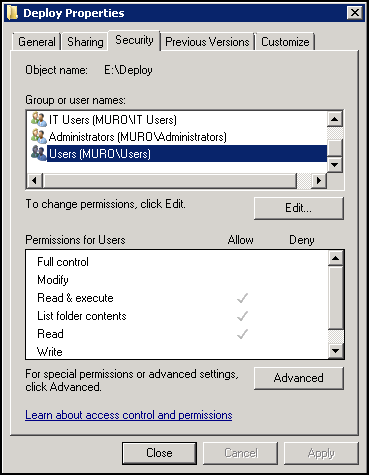
  2. Ensure the application users have a minimum of Read Security permissions (source):
  3. You should now have a UNC path of \\servername\Deploy.
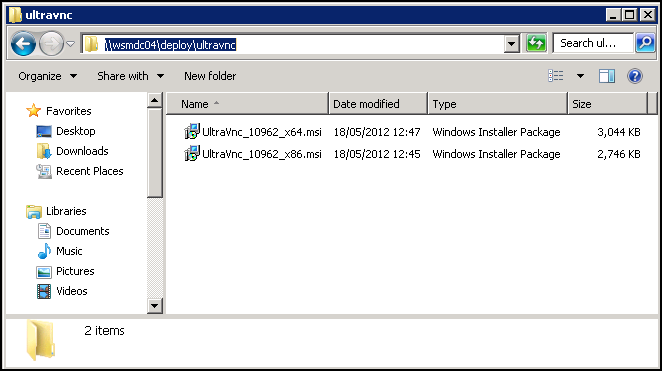
  4. Create a folder named ultravnc in the Deploy folder, then copy the modified .msi files from the previous section into the ultravnc folder:

Configuring the GPO to deploy UltraVNC

We will now create our Group Policy Object that will deploy the UltraVNC application.
There are 4 sub-sections to this:
  1. Add UNC path to .msi file.
  2. Copy the UltraVNC .ini file.
  3. Update the UltraVNC .ini file.
  4. Import registry settings.

Add UNC path to .msi file

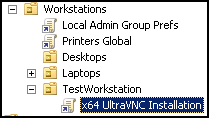
  1. Create new GPO (eg. x64 UltraVNC Installation) and link it to an OU for testing:
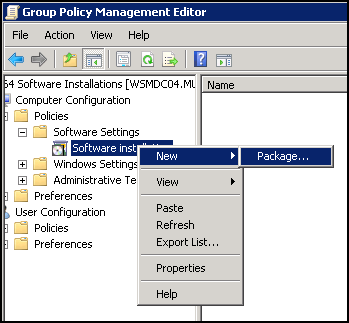
  2. Right-click > Edit on the GPO and navigate to Computer Configuration > Policies > Software Settings > Software Installation.
  3. Right-click Software Installation and select New > Package:
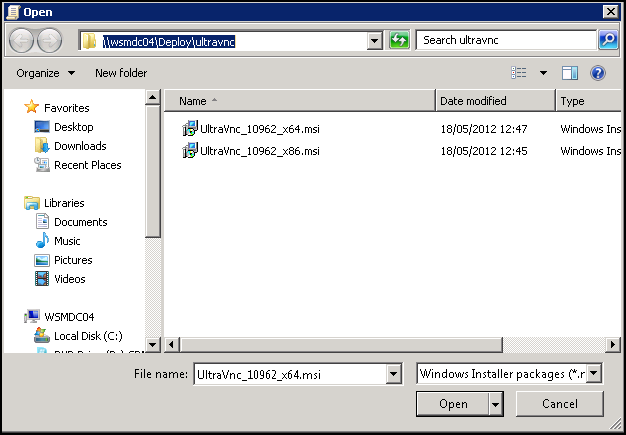
  4. Navigate to the UltraVnc_10962_x64.msi in UNC path, then click Open:
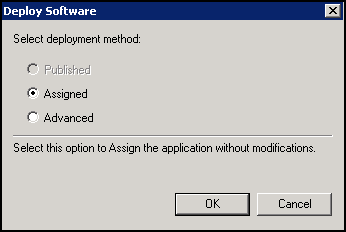
  5. Select Assigned, then click OK:

Copy the UltraVNC .ini file

  1. On the test computer, copy ultravnc.ini from C:\Program Files\uvnc bvba\UltraVnc to the UNC deployment path (\\servername\Deploy\ultravnc):
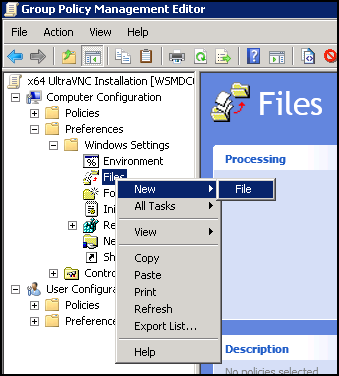
  2. Open the x64 UltraVNC Installation GPO and navigate to Computer Configuration > Preferences > Windows Settings > Files.
  3. Right-click Files and select New > File:
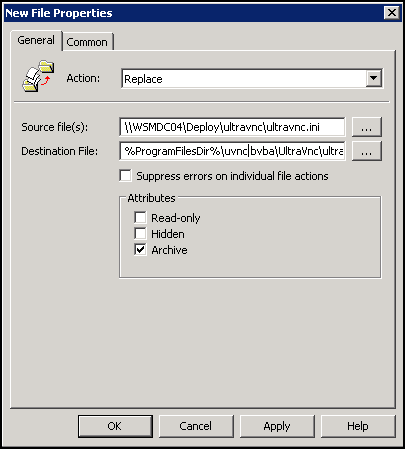
  4. Select Replace for the Action, enter the UNC path in the Source file(s) field, and %ProgramFilesDir%\uvnc bvba\UltraVnc\ultravnc.ini in the Destination File field:
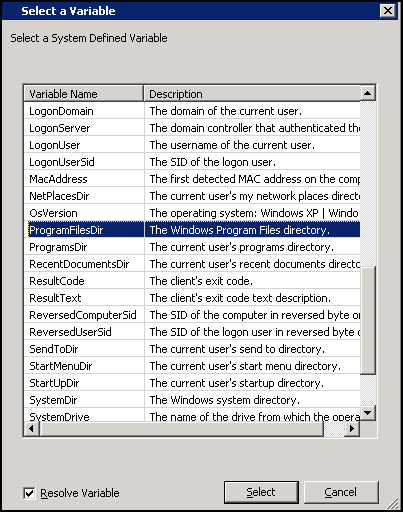
  5. If you want to use another variable for similar functions, you can view them by pressing F3 within the Source/Destination fields:
  6. Click OK to finish.

Update the UltraVNC .ini file

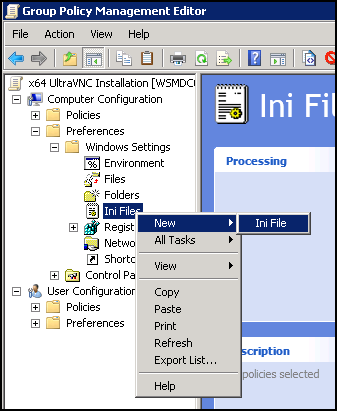
  1. Open the x64 UltraVNC Installation GPO and navigate to Computer Configuration > Preferences > Windows Settings > Ini Files.
  2. Right-click Ini Files and select New > Ini File:
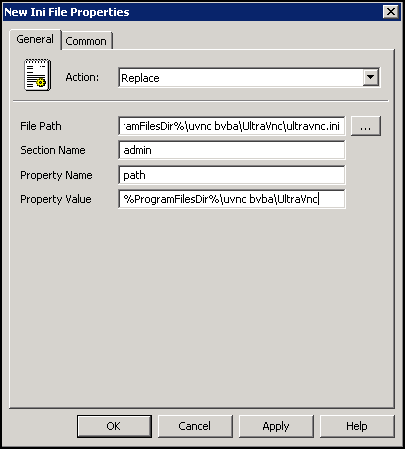
  3. Select Replace for the Action, enter %ProgramFilesDir%\uvnc bvba\UltraVnc\ultravnc.ini in the File Path field, admin in the Section Name field, path in the Property Name field, and %ProgramFilesDir%\uvnc bvba\UltraVnc in the Property Value field:
  4. Click OK to finish.

Import registry settings

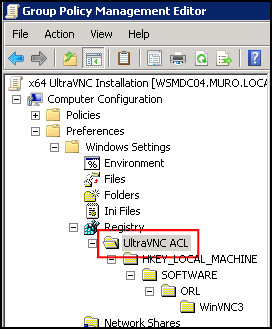
  1. Open the x64 UltraVNC Installation GPO and navigate to Computer Configuration > Preferences > Windows Settings > Registry.
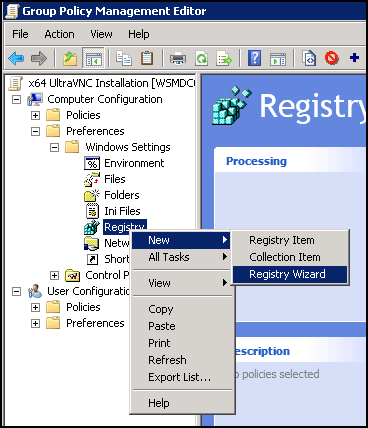
  2. Right-click Registry and select New > Registry Wizard:
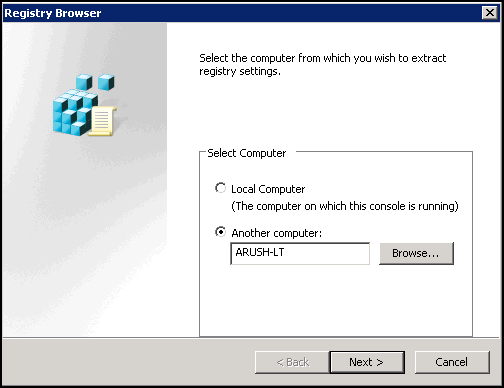
  3. Enter the name of the test computer, then click Next:

    If an error occurs at this point, make sure the Remote Registry service is running on the test computer.
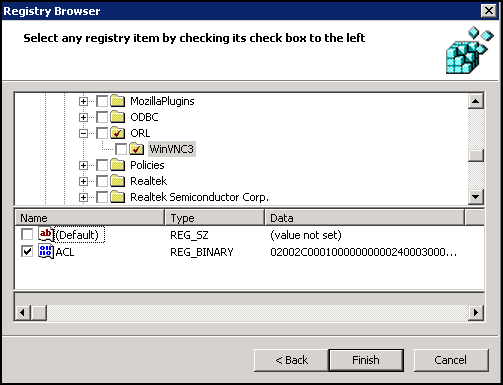
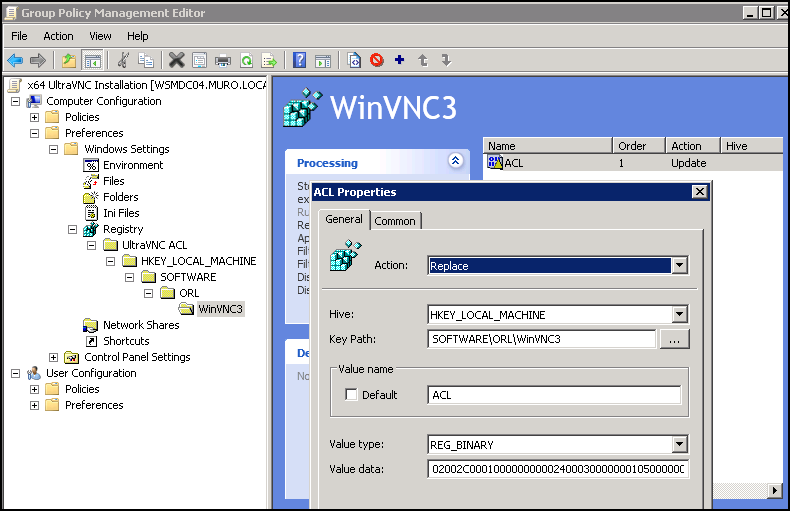
  4. Navigate to HKEY_LOCAL_MACHINE/Software/ORL/WinVNC3/, tick the ACL key, then clickFinish:
  5. Rename the label from Registry Wizard Values to something more useful, like UltraVNC ACL:
  6. Select the WinVNC3 sub-tree, double-click the ACL entry, then change the action to Replace:

Creating WMI Filters to select the correct GPO for 32-bit or 64-bit computers

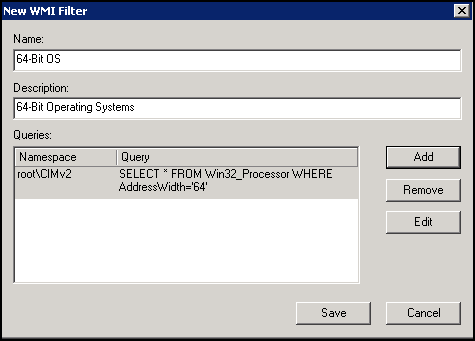
  1. Under Group Policy Management, right-click WMI Filters and select New.
  2. Enter a new namedescription, then click add.
  3. Leaving the default namespace, enter SELECT * FROM Win32_Processor WHERE AddressWidth=’64’:
  4. To target 32-bit computers, use Select * from win32_processor where addresswidth=’32’.
  5. If you need to troubleshoot, you can test your WQL queries using WMICodeCreator.

Setting the GPO scope

We need to set the scope so only the relevant computers will get the UltraVNC software.
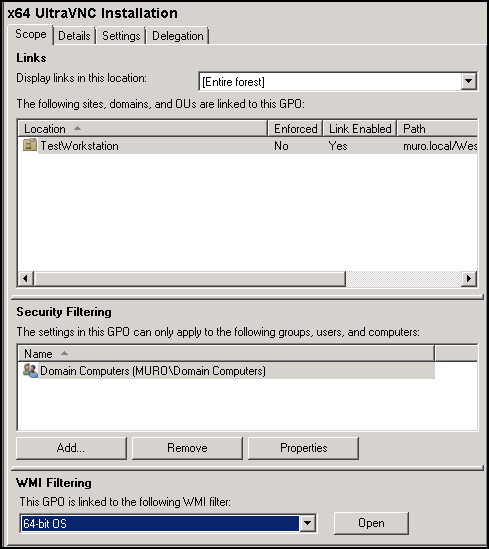
  1. Select the x64 UltraVNC Installation GPO.
  2. Remove Authenticated Users and add Domain Computers to the Security Filtering section.
  3. Select 64-bit OS from the drop-down menu in WMI Filtering section:

Enabling CTRL+ALT+DEL for Win7

Almost there now! We finally have to enable the Win7 computers to accept CTRL+ALT+DEL commands from UltraVNC.
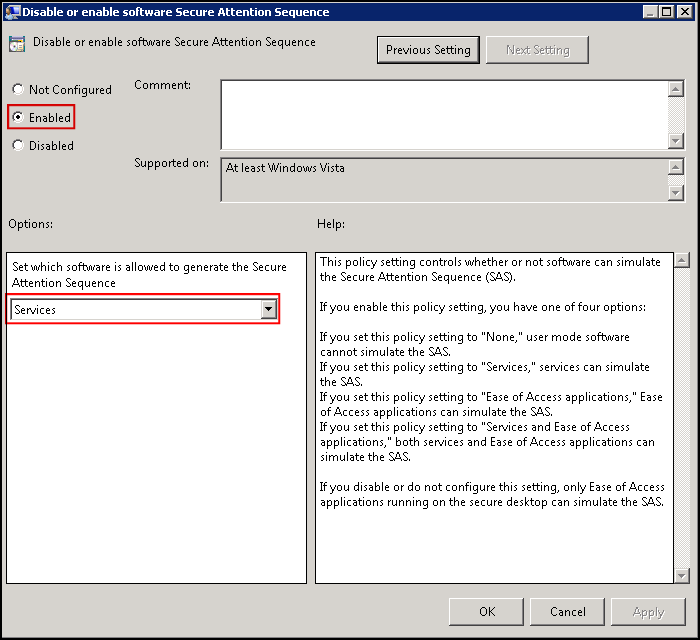
  1. Open the x64 UltraVNC Installation GPO and navigate to Computer Configuration > Policies > Administrative Templates > Windows Components > Windows Logon Options > Disable or enable software Secure Attention Sequence.
  2. Enable the policy and select Services from the Options drop-down menu:
  3. Job done!
Now you can put a few computers in the TestWorkstation OU, restart them, then test the VNC connection. All being well, you can link the GPO to a production OU.
Most of the above only covers targeting 64-bit computers, so don’t forget to follow similar steps for 32-bit computers.
Fonte: http://www.virtuallyimpossible.co.uk/deploying-ultravnc-within-an-active-directory-environment-using-group-policy/

Executar mais de uma instância do Outlook (abrir 2 outlook)


Se você já precisou em alguma ocasião abrir duas instâncias do Outlook no seu Windows sabe que isso não é possível. Ao abrir o segundo Outlook ele simplesmente mostra a mesma coisa que o primeiro aberto e não ajuda em nada. *testado no Outlook 2010
Sei que abrir dois Outlooks pode ser algo que poucas pessoas fariam mas vejam como é possível.
Para solucionar este problema o programa grátis ExtraOutlook foi criado. Como utiliza-lo?
1. Descompacte o zip para uma pasta C:\ExtraOutlook.exe
2. Anote o seguinte comando para executar um Outlook extra:

 extraoutlook.exe "C:\Program Files\Microsoft Office\Office14\Outlook.exe" /profile "Seu Nome"  

onde “Seu Nome” deve ser substituído pelo nome do seu perfil no windows.
OBS: verifique o caminho exato do seu Outlook clicando no ícone do mesmo com o botão direito do mouse e em seguida propriedades, veja e copie o caminho do executável.
3. Ao executar este comando uma segunda instância do Outlook é aberta.
Caso você queira colocar o comando num atalho, basta criar um arquivo texto com o bloco de notas, renomear para ExtraOutlook.bat e colocar as seguintes linhas no conteúdo:
 cd\  
 cd c:\ExtraOutlook  
 extraoutlook.exe "C:\Program Files\Microsoft Office\Office14\Outlook.exe" /profile "Seu Nome"  

Salve e ao clicar duas vezes neste arquivo o seu segundo Outlook será iniciado.

Fonte: http://www.asktheadmin.com/2008/10/extraoutlook-13-download-link.html
http://www.gusleig.com/sos/2008/10/aplicativos-programas/windows/como-abrir-dois-outlooks-ao-mesmo-tempo/

terça-feira, 12 de abril de 2016

Windows: 135 comandos para usar na função executar ou no Prompt

Comandos

  1. Sobre o Windows (Ver a versão do Windows) = winver
  2. Atualizações automáticas = wuaucpl.cpl
  3. Adicionar ou remover programas = appwiz.cpl
  4. Administrador da origem de dados de ODBC = odbccp32.cpl
  5. Assistente de acessibilidade = accwiz
  6. Assistente de câmara ou scaner = wiaacmgr
  7. Assistente de configuração de rede = netsetup.cpl
  8. Assistente de cópia de segurança ou restauro = ntbackup
  9. Assistente de ligação ? Internet = icwconn1 / inetwiz
  10. Assistente de transferência de definições e de ficheiros = migwiz
  11. Assistente de transferência de ficheiros do Bluetooth = fsquirt
  12. Assistente para adicionar hardware = hdwwiz.cpl
  13. Calculadora= calc
  14. Centro de segurança do Windows = wscui.cpl
  15. Certificados = certmgr.msc
  16. Cliente Telnet = telnet
  17. Configuração de protocolo de Internet (apagar informações de DNS ) = ipconfig /flushdns
  18. Configuração de protocolo de Internet (Todas as conexões ) = ipconfig /release
  19. Configuração de protocolo de Internet (ver DNS ) = ipconfig /displaydns
  20. Configuração de protocolo de Internet (ver tudo) = ipconfig /all
  21. Configuração de protocolo de Internet (Modificar DHCP Class ID) = ipconfig /setclassid
  22. Configuração do IP = ipconfig
  23. Conjunto de politicas resultante (XP Prof) = rsop.msc
  24. Constas de utilizadores = nusrmgr.cpl
  25. Controladores de jogos = joy.cpl
  26. Definições da segurança local = secpol.msc
  27. Desfragmentador do disco = dfrg.msc
  28. Desliga o utilizador do Windows = logoff
  29. Editor de caractere privado = eudcedit
  30. Editor de configuração do sistema = sysedit
  31. Editor de registo = regedit / regedit32
  32. Encerramento do Windows = shutdown
  33. Explorador do Windows = explorer
  34. Ferramenta de diagnóstico do Direct X = dxdiag
  35. Ferramenta de importação de livro de endereços = wabmig
  36. Ferramenta de remoção de software malicioso Microsoft Windows = mrt
  37. Ferramentas administrativas = control admintools
  38. Firewall do Windows = firewall.cpl
  39. Fontes = fonts
  40. Gestão de computadores = compmgmt.msc
  41. Gestão de discos = diskmgmt.msc
  42. Gestor de dispositivos = devmgmt.msc
  43. Gestor de objetos – pacote = packager
  44. Gestor de partições do disco = diskpart
  45. Gestor de tarefas do Windows = taskmgr
  46. Gestor de utilitários = utilman
  47. Gestor de verificador de controladores = verifier
  48. HyperTerminal = hypertrm
  49. Iexpress Wizard = iexpress
  50. Impressoras e faxes = control printers
  51. Infra-estrutura de gestão do Windows = wmimgmt.msc
  52. Iniciar Windows Update = wupdmgr
  53. Itens a sincronizar = mobsync
  54. Internet Explorer = iexplore
  55. Introdução do Windows XP = tourstart
  56. Jogo de cartas Copas = mshearts
  57. Jogo de cartas FreeCell = freecell
  58. Jogo de cartas Paciência Spider = spider
  59. Jogo Campo Minado= winmine
  60. Ligação ao ambiente de trabalho remoto = mstsc
  61. Ligações de rede = ncpa.cpl / control netconnections
  62. Limpeza do disco = cleanmgr
  63. Linha de comandos = cmd
  64. Lista telefônica = rasphone
  65. Livro de endereços = wab
  66. Mapa de caracteres = charmap
  67. Marcador telefônico = dialer
  68. Microsoft Access (se instalado ) = msaccess
  69. Microsoft Chat = winchat
  70. Microsoft Excel (se instalado ) = excel
  71. Microsoft Frontpage (se instalado ) = frontpg
  72. Microsoft Movie Maker = moviemk
  73. Microsoft Paint = mspaint
  74. Microsoft Powerpoint (se instalado ) = powerpnt
  75. Microsoft Word (se instalado ) = winword
  76. Nero (se instalado) = nero
  77. Netmeeting = conf
  78. Notepad = notepad
  79. Nview Desktop Manager (se instalado) = nvtuicpl.cpl
  80. Opções de acessibilidade = access.cpl
  81. Opções de pastas = control folders
  82. Opções regionais e de idioma = intl.cpl
  83. Outlook Express = msimn
  84. Painel de controle = control
  85. Painel de controle Direct X (se instalado) = directx.cpl
  86. Painel de controle Java (se instalado) = jpicpl32.cpl
  87. Paint = pbrush
  88. Partilhas DDE = ddeshare
  89. Pasta de impressoras = printers
  90. Pastas compartilhadas = fsmgmt.msc
  91. Pedidos do operador de armazenamento removível = ntmsoprq.msc
  92. Performance Monitor = perfmon
  93. Performance Monitor = perfmon.msc
  94. Phone and Modem Options = telephon.cpl
  95. Pinball para Windows = pinball
  96. Politica de grupo (XP Prof) = gpedit.msc
  97. Power Configuration = powercfg.cpl
  98. Procura rápida (quando ligada) = findfast.cpl
  99. Propriedade des visualização = control color
  100. Propriedades da internet = inetcpl.cpl
  101. Propriedades de data e hora = timedate.cpl
  102. Propriedades de senhas = password.cpl
  103. Propriedades de som e dispositivos de áudio = mmsys.cpl
  104. Propriedades de visualização = control desktop/desk.cpl
  105. Propriedades do rato = main.cpl / control mouse
  106. Propriedades do sistema = sysdm.cpl
  107. Propriedades do teclado = control keyboard
  108. Protecção de base de dados do Windows = syskey
  109. Protecção de ficheiros do Windows (analisar em cada arranque) sfc /scanboot
  110. Protecção de ficheiros do Windows (analisar no próximo arranque) = sfc /scanonce
  111. Protecção de ficheiros do Windows (analisar) = sfc /scannow
  112. Protecção de ficheiros do Windows (repor configuração de fábrica) = sfc /revert
  113. Quicktime (se instalado) = QuickTime.cpl
  114. Real Player (se instalado) = realplay
  115. Scanners e câmaras = sticpl.cpl
  116. Serviço de indexação = ciadv.msc
  117. Serviços = services.msc
  118. Serviços componentes = dcomcnfg
  119. Tarefas agendadas = control schedtasks
  120. Teclado de ecrã = osk
  121. Tipos de letra = control fonts
  122. Tweak UI (se instalado ) = tweakui
  123. Utilitário de configuração do sistema = msconfig
  124. Utilitário de rede do cliente de SQL Server = cliconfg
  125. Utilitário de verificação de ficheiros do sistema = sfc
  126. Utilitário de verificação do disco = chkdsk
  127. Utilitário Dr. Watson para o Windows = drwtsn32
  128. Utilizadores e grupos locais = lusrmgr.msc
  129. Verificação de assinatura do ficheiro = sigverif
  130. Visualizador da área de armazenamento = clipbrd
  131. Visualizador de aplicações de java (se instalado) = javaws
  132. Visualizador de eventos = eventvwr.msc
  133. Windows Magnifier = magnify
  134. Windows Media Player = wmplayer
  135. Wordpad = write
fonte: http://suporteninja.com/windows-135-comandos-para-usar-na-funcao-executar-ou-no-prompt/